Roll cage delete

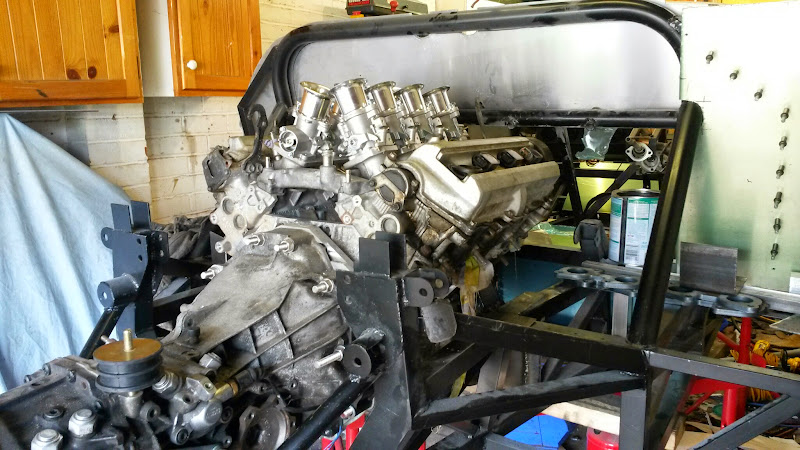
My kit came with a roll cage. After a lot of thought however I decided to remove it.

A roll cage is a good thing in a GT40 as the A pillars are almost non-existent. I’ve heard tales of GT40-inexperienced passengers cracking the screen by using the A pillar to grab on to.

There is a big but here. Only if you are religious about wearing a helmet. Even a minor bump without one could result in “life changing” head injuries. There is next to no clearance in the GT40 and I personally felt the risk of hitting the roll cage in a minor bump was higher than the roll cage saving you (on the road).

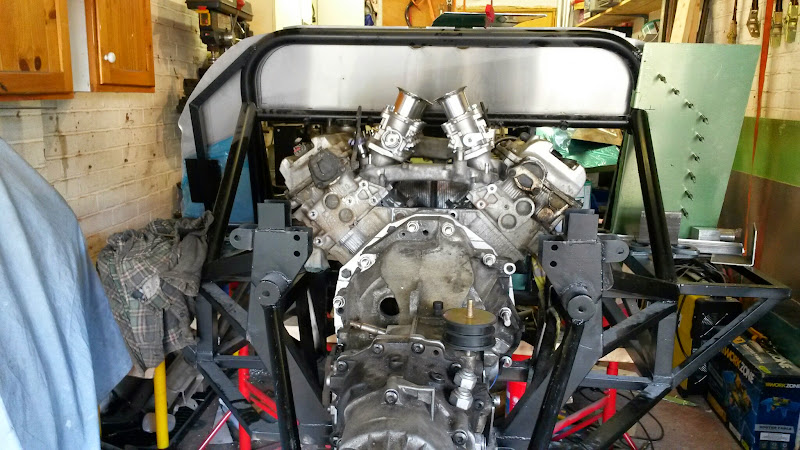
There was only one issue however. I’m likely to want a cage in at some point if (when) I take it on track which is some what of an issue as even with the roll cage “removed” the stubs on the roll-over bar remain and are pretty much just as bad.

Plus it’s actually impossible to fit the roll cage without removing the spider and (almost certainly) impossible to remove the spider without breaking the windscreen.

A lot of thought later and I had a solution. First I cut off the stubs.

Then I took two identical strips, drilled 8 holes through both and welded in weld nuts to the back.

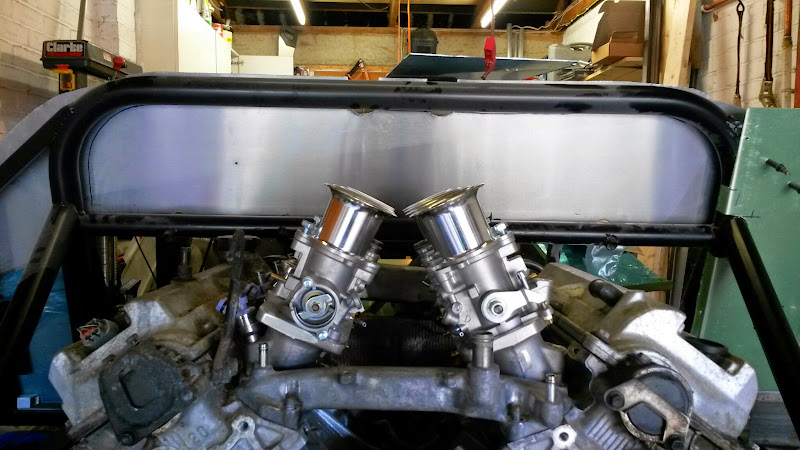
This was then welded onto the roll-over bar part of the roll cage to give this

The rear bulkhead was then trimmed round it. Now it protrudes but only very slightly.

With the window cut out it looks like this

I’ll put a bit of a cover over it however to blend it in more.

This will let me bolt in a cage if I want (I’ll have to be two part still) without removing the spider and without leaving the dangerous stubs.


Gearchange part 2 (the mechanism)

So, with the gearlever in place it was time to think about how things would get from the lever to the gearbox. A bit of a play with some bar seemed to indicate a rod shift was just possible.

Albeit mightily tight

So I made up a bracket with a bush and welded it to the chassis

Now, I just needed to work out how to get it the rod here (the pointy ended one) link through to the other side of the gearbox.

That can wait until the gearbox is back in however.


Electrics #1

Nothing doing here, just some photos of the bits.

Warning lights and switches

I’ve also got some switch guards. Not got a photo of mine but they are like this:

Water temp / Fuel Gauge / Oil Pressure

Tacho (out of a Superformance GT40 again)

Speedo (0-200mph of course)


Engine mounts (chassis side)

With the engine side of the brackets sorted I took advantage that the kit manufacturer did gearbox brackets. The saved me that job at least.

Shockingly I have no photos of them. The best I can manage is this which shows my attempt at seeing if a rod change might work.

Anyway, with the gearbox in place and the engine centralised in the engine bay with the sump level with the bottom of the chassis I could think about the chassis side brackets.

First off I measured the distance between the bracket and the top of the chassis. Then I removed the engine, measured that far down the horizontal mount locations, then added the thickness of the rubber bushes + 3mm. I clamped a piece of angle in place, drilled through and bolted it up.

This now left me an angled plate a set distance from the bracket.

Then use of special tool #2342

Then drill the hole and trial fit with the bush.

Hmm, not much metal at the end there….

Fear not more metal welded in and we end up with a bracket looking something like this.

To which the mounts fit like this

The tiny 6mm holes I’d drilled for temp location were then drilled out to 10.5mm with M10 weld nuts fitted to the brackets and extra bracing welded on too (no photos again of that, sorry).


Gearchange part 1 (the lever)

In an original GT40 the lever sits on the right sill. This was largely “because race car” but for valid engineering reasons as well.

At first I was going to put in a centre shift because I’m used to a centre shift but then I thought about it some more and reconsidered. I looked at a number of options, mostly cable actuated.

Then one of the group of builders said he was going to get a replica of the original gear-lever setup made…

So this needed mounting. Much sitting in the car was done before selecting the position where the lever “felt” best. Far enough from the wheel to not be in the way but close enough to enable a short reach to change gear. Roughly as well where the originals sat.

I welded in some square tube on to the chassis with some rivnuts to bolt it to.

These then have holes drilled large enough for the rivnut flange in the side panel so that the gearchange sits flush against the side panel.


Seats

My previous update had a few photos of the seats so I figured I should probably put an update on them!

The seats had a long and convoluted journey.

At first I planned to just buy some Inatrim GT40 seats (http://www.intatrim.co.uk/gt40.html). Then I sat in them and realised they didn’t fit. I’m very broad in the shoulders and the “wings” dug into my shoulders. I was uncomfortable in seconds. So back to the drawing board.

The seats in a GT40 are incredibly narrow (450mm or less) and laid back which eliminated almost all the “off the shelf” options. So the first thing was a CAD model. That’s Cardboard Aided Design ( © “Project Binky” ) wink

The cat was fairly happy with the cardboard seat but I wasn’t quite so keen.

I followed the cardboard seat with a fibreboard mock up. It’s pretty much just extra stiff card.

And of course then sat it in the car.

The next stage was something with more structural strength. A 1mm steel mock up. Still trying to get the general dimensions nailed here rather than looking pretty or anything. Steel being chosen because it’s very easy to just tack together and just grind the welds off to change things.

The steel mock up went through a few iterations. Losing height from this

to this

The seat base equally went through plenty of revisions. From the initial version through this.

and then finally settling on this. Shown here being tested with the belts.

Then when I was happy I chucked the mock up out…well actually I cut it apart and re-used the bits!

Then I started to make the seats properly in aluminium. I’d decided that the seats will be fixed like the originals. Although a metal base not ribbing. I also decided that the best way to do the seat backs was to have them pivot at the base. That way the space behind them can be utilised/accessed.

First off the base, this was in two pieces. A flat section.

then a formed section

And finally the back

The back is hinged and bolted to the rear bulkhead. I considered some kind of quick release (and I may still do so) but felt bolting was best for now. There is btw no seat adjustment. You either fit or you don’t.

I welded in some strip to the rear bulkhead so that it could bolt to it.

Then of course repeat for the passenger side. So the seats look something like this at the moment.

They will of course be trimmed but that will happen later. I also need to make up some headrests for them.

6-point Harness (and seat) mounts

So one of the issues with the laid back seats in the GT40 is there is a very real risk if you crash of “submarining”, basically going under the bottom of the belt and ending up in a broken heap in the footwell. Now crashing in a kit car (or any vehicle for that matter) is not advisable at the best of times but there is no point in making thinks riskier than they need to be. Now having a “slope” on the seat front should help prevent submarining but the real way is with 5 or 6 point harnesses.

So it was a choice between 5 and 6 point harnesses and frankly the centre strap in the 5-point didn’t sound comfortable so it was a 6-point harness. The only issue was fitting it. Shoulder and lap fitments were fine, the chassis came with those already.

I read up on all the fitting instructions and frankly there just wasn’t anywhere *to* fit the anti-submarine straps *to*. The seat is so low to the floor that there wasn’t enough room for the classic re-enforced patch + eyelets and besides it’s aluminium so not considered strong enough.

A lot of thought later and googling many designs, with IIRC some inspiration from the Porsche GT3RS and I came up with this massive amount of overkill.

The belts drop through a hole in the seat and loop round the bars.

There is *just* enough room to feed the belt through between the bars and the floor.

So the end result is somewhat like this (rough bits of foam in the seat pan just to make it slightly more like a seat)

Obviously there is some rubber edging round the edges to prevent the belts chafing.

Progress update

I apologise for the lack of updates. It’s not dead, there has been significant progress…just no updates.

I’ll just leave a photo of some bling while I write up some more updates.

I tried so hard to save money on the fuel caps but they are kind of a defining external feature of the GT40. Unfortunately where I’ve seen people use Aston caps or similar they just look wrong.

I refuse to even consider what these cost me but I can take some solace in at least they were cheaper when I bought them than they are now.


It’s all very tyre-ing

I’m currently in the middle of looking at suspension geometry but there is somewhat of an issue… that of tyre choice. So I’ve decided to tie down what size wheels and tyres I will be using.

I’ve already decided my wheels are going to be 8in wide front, 10in wide rear (or there abouts). I’m going to pick the most common cheapest suitable sizes. Tyre diameters are from here, tyre availability and prices are taken from blackcircles.

There are many reasons behind this logic.

  • More choice, the more original GT40 replicas are restricted to only a couple of tyres. With many manufacturers I’ve got the choice between going sticky and short lived or hard and long lived.
  • Cheaper. While running costs are not going to be cheap and I’m not going just on price the difference in 10mm width (or 1in dia) can be 100’s of £, see the difference below in the cost of a 275/40R17 vs a 285/40R17, 1cm wider but a new pair of 285/40R18 will cost £200-£400 extra!
  • Cheaper! Mentioned twice because if rear tyres are £100ea I’m not going to worry about ruining a set on a trackday etc. OTOH I may cry if they are £350ea!
  • Availability. If I get a puncture I want to be able to go to a garage and get a replacement. I don’t want to be in the position of having one tyre maker who do one run a year and there being no stock locally (if at all) or just not available any more (Ducati 906 Paso anyone?)

So onwards, lets look at what the originals used vs the modern SPF recreation. Now these are only one example as the GT40 used many different sizes in it’s race life.

Front originally approximately a 250/60R15 and a 225/50R15 or 225/60R15 used as a modern replacement.

Rear originally  approximately a 325/60R15 and a 295/50R15 or 275/60R15 used as a modern replacement.

So firstly I’m going to ignore the non-common (and original) sizes and work out the diameter of the remaining.

225/50R15 = 606mm

225/60R15 = 651mm

295/50R15=676mm

Lets look at tyre availability…

225/50R15 – two tyres, £80-£95ea

225/60R15 – eight tyres, £56-300ea

295/50R15 – one tyre, £375ea

OK, original sizes are out.  Fronts are cheap enough but no range and only one rear!

I want to keep the same “look” with the rears larger than the fronts so want to keep roughly 50mm (2in) larger on the back than the front.

Lets look at 16in wheels, firstly lets work out the recommended sizes (no stretch here!) using a tyre size calculator. For the front 8in wheel we have an ideal of 225 to 235. So lets keep it as a 225 for now.  On the rear we have an ideal of 265-275. Keeping the width and overall dia (nearly) the same the choices are a 225/45R16 (608.9mm, 4 tyres available, £96-£131ea) or a 225/55R16 (653.9mm, 74 tyres available!, £41-£135ea) for the front and er nothing for the rear, nearest can get is a 255/50R16 (661mm, 1 available, £387.29ea).

Onto 17in wheels, again the 8in front is recommended 225-235 and the rear 265-275 (max 285) here we have a choice of three, nothing that is near 606mm, nearest is a fair bit smaller. Choices are 225/35R17 (589.3mm, 3 tyres, £100-£152ea), 225/40R17 (611.08, 36 tyres, £68-£132), 225/45R17 (634mm, 166 tyres available!!!!, £44-£122ea), 225/50R17 (656.8mm, 116 tyres available, £51-£142ea). Rear tricky again choice of 255/40R17 (635.8mm, 21 tyres available, £73-£151), 255/45R17 (661.3mm, 7 tyres available, £143-£191), 265/40R17(643.8mm, 1 tyre, £131.59),  275/40R17 (651.8mm, 1 tyre, £174.09), 285/40R17 (659.8mm, 2 tyres, £268.59-£371.59ea),

Finally 18in wheels, same widths still.  front 235/30R18 (598.2mm, 0 tyres), 225/35R18, (614.7mm, 9 tyres, £106-£140ea), 225/40R18 (637.2mm, 90 tyres, £48-£99), 235/35R18 (621.7mm, 0 tyres) .  Rear 275/35R18 (649.7mm, 14 tyres £94-£238), 285/35R18 (656.7mm, 13 tyres, £156-£245), 265/40R18 (669.2mm,18 tyres, £106-£243), 275/40R18 (677.2mm, 10 tyres £179-£243), 285/40R18 (686.7mm, 1 tyre, £346), 255/40R18 (661.2mm, 31 tyres, £79-£187)

OK. We now have a lot of data and the chosen results are…..

Front 225/40R17. Not the cheapest, not the most available but in a pinch I could fit a 225/45R17 (gain 11mm front height) or a slightly wide 235/40R17. The 18in wheels just didn’t have small enough tyres available.

Rear 255/40R18. A larger wheel on the back mostly as more suitable sizes. Slightly narrow and the cheapest tyre this time but spot on sized at 50mm larger diameter than the front and as I’m “only” going for ~300hp a 255 rear will be fine.